Friday, February 20, 2015

Blueberry Elephant Macarons

Blueberry Elephant Macarons
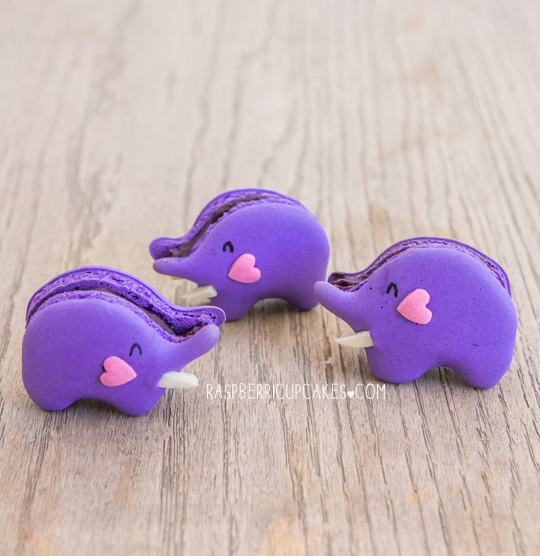
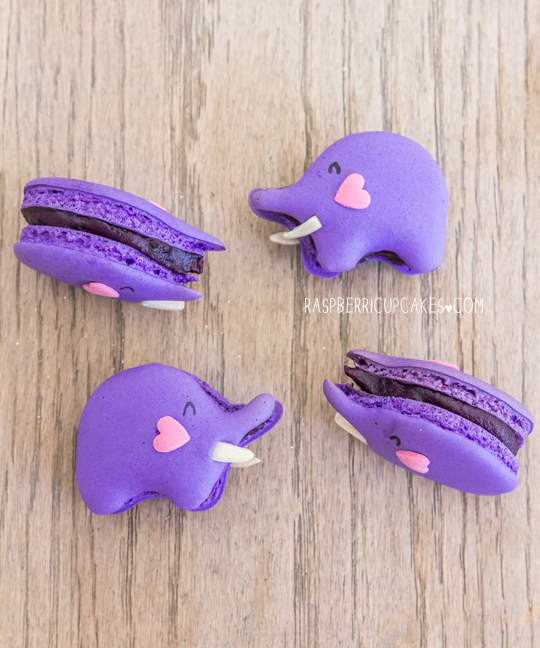
I have no excuses. Not only have I not blogged in almost a month, I haven't baked in almost as long. A few years ago this would have been unheard of! But at the moment it's an unfortunate side-effect of my life. The last baking I did was for a dear friend's wedding in January, they asked me to make some personalised macarons for them and I was super excited to make something special. The requested macarons were purple elephants and black skulls, which was quite an interesting challenge. I just had to share the purple elephants with you guys, they are so darn adorable I can't stand it. I think they might be my favourite of all the animal macarons I've made so far (though the cats are a close second). They were also the hardest to pipe, I had to use a stencil on my baking paper for the first time.
Blueberry Elephant Macarons
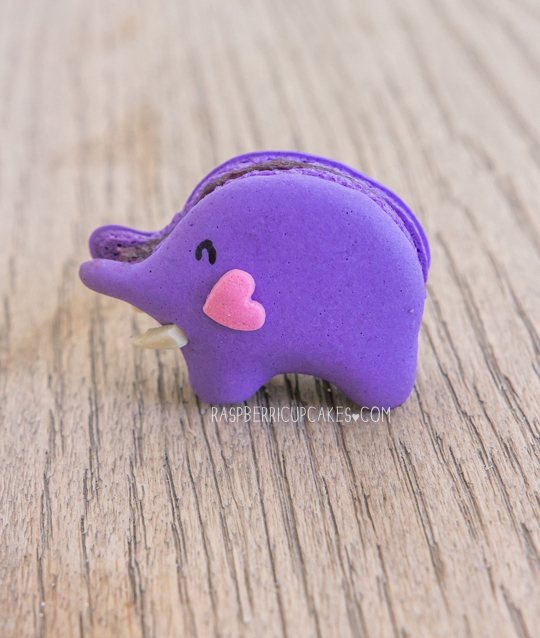
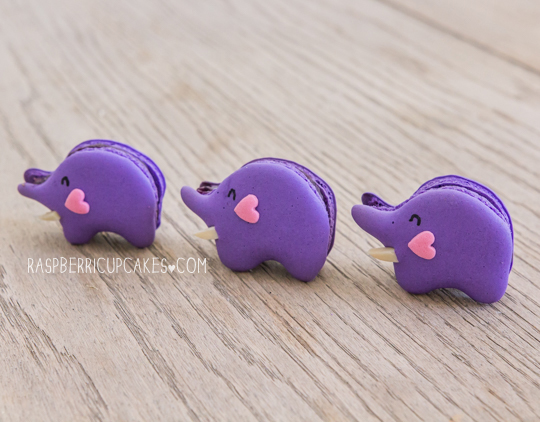
The tusks are made from slivered almonds (I was pretty proud of this, I had a bit of a lightbulb moment in a supermarket aisle while trying to figure out what to use), and the ears are big heart sprinkles. I made about 80 of these stumpy, cute, fat little elephants, which was a rather slow and painful process. But totally worth it in the end. The filling was a blueberry ganache, while the black skulls (I didn't remember to take any photos of them unfortch) were filled with a mango buttercream. I think (hope) the macarons went down well at the wedding. Anyway I finally got off my bum and edited the few shots I managed to grab of these little dudes before I shipped them off to the wedding, so here you go!
Blueberry Elephant Macarons
Blueberry Purple Elephant Macarons
(recipe adapted from Trissalicious)
For the macarons:
Note: this method uses an Italian meringue. If you prefer, you can continue to use the French method I normally use. If you are a beginner with macarons read up and practice plain macarons first. BraveTart has lots of useful advice and info on the subject
Almond Meal Paste:
125g almond meal
125g icing/confectioner's sugar
50g egg whites
Italian Meringue:
125g caster (granulated) sugar
35g water
50g egg whites
Pinch of egg white powder
Purple powdered/gel food colouring, heart sprinkles and slivered almonds + black food colouring to decorate
  1. To achieve the elephant shape, I cut an elephant shaped stencil out of cardboard and traced the shape on to sheets of baking paper for piping. Remember you need to make half the elephants piped to face the left, and the other half to face to the right so that you have mirror images that can be sandwiched together.
  2. In a food processor, blend the almond meal, icing sugar together for a minute, then add egg whites and blitz for a couple seconds to form a paste. Set aside.
  3. To make the Italian meringue, place the caster sugar in a saucepan.  Add the water and make sure that the sugar is dampened.  Heat the mixture and bring this to a boil (do not stir).  Place a candy thermometer in the syrup and take the temperature of 118°C (245°F)
  4. While the sugar is cooking, beat the egg whites and egg white powder using a stand mixer fitted with a whisk attachment and beat at medium speed until the eggs become foamy. Continue beating on high until stiff peaks form.
  5. Stop the syrup from cooking once it reaches 118°C (245°F) and take this off the heat and let the bubbling subside for a few seconds.  Pour the syrup in a thin, steady stream over the beaten egg whites while the continuing to whisk at medium speed.
  6. When all the syrup has been added, (add food colouring here) continue to beat until glossy and meringue has cooled to room temperature (around 10 to 15 minutes).
  7. Using a silicone spatula, fold a third of Italian meringue into the almond mixture to loosen it.  Then, fold in the rest of the Italian meringue.  (You really want to beat all the large bubbles out of the mixture, which is easily done by smearing the mixture on the bottom and side of the bowl with your spatula) Continue folding and stirring until the batter is glossy, and fluid. Take care not to overmix, the mixture should flow like lava and a streak of mixture spread over the surface of the rest of the mixture should disappear after about 30 seconds. 
  8. Place 1/3 of the mixture in a piping bag with a very narrow tip (1-2mm) and the remaining mixture in a piping bag with a slightly wider (about 0.5cm) round piping tip. Use the wider tipped bag to fill in the body of the elephant, then the narrower tip to add on the legs and trunk of the elephant. Tap baking trays carefully and firmly on the benchtop a couple times to remove any large bubbles.
  9. Decorate each shell with a half piece of slivered almond for the tusk and a pink heart for the ear (if you can't get big enough sprinkles, you can also use rolled pink starburst chew lollies or pipe royal icing on the baked shells).
  10. Leave to dry for about 60 mins, until when you press the surface of one gently it does not break/stick to your finger. This will help prevent any cracking and help the feet to form on the macs.
  11. Preheat your oven to 130-150°C (265-300°F), depending on your oven (fan-forced ovens may need to be set as low as 100°C, it really depends) . You can place the tray of piped shells on top of an upside-down roasting tray or another baking tray, for better heat distribution.
  12. Bake for 15-20 minutes. Carefully test if the base of the shell is ready by gently lifting one and if it’s still soft and sticking to the baking paper, then it needs to bake for a few minutes longer. 
  13. Remove from the oven and cool on the tray for a few minutes, then gently remove from the sheet and place on a wire rack to cool completely.
  14. Use a black edible ink pen or a skewer dipped into black food colouring to draw on the eyes.
Blueberry Elephant Macarons
For the Blueberry Filling:
Note: You can replace the blueberry sauce with store-bought blueberry jam to save time
100g (1.7oz) blueberry (fresh or frozen), pitted and diced
 3 tbsp sugar
 2 tsp lemon juice
A few drops of pure vanilla extract
3 tsp cornflour (cornstarch) + 1 tsp cold water
3 tsp powdered gelatine
100g (3.5oz) good quality white chocolate, finely chopped
  1. Prepare the blueberry filling first; place blueberries, sugar, lemon juice and vanilla in a small saucepan and place on medium heat. Stir over heat until sugar dissolves. 
  2. Mix cornflour and water together in a separate small bowl then add to the saucepan with gelatine powder and stir over medium heat until mixture thickens and gelatine dissolves, about 2-3 minutes. Set aside to cool then blitz mixture in a food processor. 
  3. Place blueberry mixture and chopped white chocolate in a heatproof bowl and stir over a pot of simmering water until the chocolate melts and the mixture combines (if chocolate splits, add 1 tsp of water at a time and stir over heat until mixture reincorporates). 
  4. Chill mixture until it thickens (if it is too runny, you can melt more white chocolate into it), and then pipe mixture between macarons shells.
  5. Chill macarons in an airtight container overnight to allow flavour to mature. Serve at room temperature.
Print Friendly and PDF

Monday, January 12, 2015

Jaffa Layer Cake with Macarons

Jaffa Layer Cake with Macarons
Hi! Happy New Year! Can you believe its 2015? Well it is. I know, I've been very quiet. I've been very busy. Life is craaaaaaaaaaazy. But there is always cake. I thought I should share this recipe with you before I forget how I made it. Because it's a pretty good one. Last month was my brother's 40th birthday. A big occasion like that called for a big cake, or at least a very pretty one.
Jaffa Layer Cake with Macarons
My sister-in-law planned a lovely surprise party for my brother and of course I was tasked with the birthday cake. One of my brother's favourite flavours is chocolate and orange and he LOVES jaffa cakes. So I thought I would make a layer cake based on the flavours and textures of the good old jaffa cake. I made four layers of my favourite orange tea cake from Stephanie Alexander, it's always light and fragrant. I sandwiched the cake layers with orange jelly, which I set with half the usual amount of liquid so it wouldn't fall apart inside the cake (dodgy instagram innards shot at the bottom of the post). The cake was covered in a thick layer of rich but not too sweet dark chocolate and orange icing and lots of gold leaf to add something special.
Jaffa Layer Cake with Macarons
I topped the cake with bits of jaffa cakes, jaffa chocolate balls and jaffa flavoured macarons. As always I agonised over getting the icing neat and smooth enough, and I'm never satisfied with it. I used my fancy icing comb to create the texture on the side, and I kinda love it. Though the gold leaf is actually hiding my very untidy edges because I got too fed up with trying to smooth the corners.
Jaffa Layer Cake with Macarons
The cake went down very well with everyone at the party and looked very pretty sitting next to the delicious canapes from Simmone Logue catering (highly recommended for anyone looking for fancy party catering). My brother was not at all surprised by his surprise party since he noticed it marked on his friend's calender a few weeks earlier, and saw me loading food into our car right before the party. Doh. But it was still fun and I think he loved the cake. The jelly layers worked surprisingly well with the cake, and the slightly bitter chocolate icing was good for balancing out the sweetness of the jelly. This cake is sure to win over anyone who loves the classic combination of chocolate and orange.
Jaffa Layer Cake with Macarons
(makes a 4-layer 15cm (6", this is what I used) or 18cm (7", will result in slightly thinner layers) cake, cake recipe adapted from Stephanie Alexander's The Cook's Companion)
For the orange jelly layers:
Using two orange jelly/jello (2x85g) packets, (I used Aeroplane Jelly), prepare 3 of the same sized baking tins that you are going to use for the cake, greased and line with baking paper. Make up jelly as per instructions, but only use HALF the specified amount of water. This will ensure that the jelly will set firmly. Pour equal amounts of jelly mixture into prepared tins and chill in fridge until set (I prepared mine the night before assembling cake).

For the cake:
2 large oranges
3 large eggs, at room temperature
220g (about 2 sticks) butter, softened
1 cup (200g) caster (granulated) sugar
400g (approx 3 cups) self-raising flour
  1. Preheat oven to 190°C (375°F) (if fan-forced use 180°C (350°F)) and grease and line the base with baking paper of four 15cm (6", this is what I used) or 18cm (7", will result in slightly thinner layers round baking tins (I used two and baked two layers at a time).  
  2. Zest and juice oranges. Combine all cake ingredients in a food processor and blend for 2 minutes. If you have extra time and are worried about over-mixing the flour like me, blend the orange juice and zest, butter, sugar and eggs together first for one minute, then add the flour and blend for another minute. If you don't have a food processor, cream butter and sugar together using an electric beater until light and smooth. Add eggs at a time and beat in well. Add the juice, zest and flour and quickly mix until combined, avoid overbeating the flour. 
  3. Split the batter into four equal portions (I used a scale to measure it exactly), and pour into prepared tin(s) and smooth with a spatula. 
  4. Bake in the oven for 15-20 minutes or until golden and a skewer inserted into the centre comes out clean. Cool in tin for 5 minutes and then carefully remove and cool cake on wire rack completely. (Cakes can be made a day ahead and wrapped in cling film in the fridge overnight before icing)
Jaffa Layer Cake with Macarons
For the macarons:
Follow these instructions to make shells, using red/orange food colouring. (Or you can use my old French method)
Prepare the orange chocolate ganache, using 100g dark chocolate with 1/4 tsp orange essence/extract, finely chopped and placed in a heatproof bowl. Heat 90ml (about 1/3 cup) thickened/heavy cream just  to the boil then pour over chopped chocolate and leave to melt for a few minutes before whisking. Chill ganache until it thickens but is still pipable, then fill macaron shells and leave in the fridge overnight to allow the flavour to mature.

For the chocolate-orange icing:
340g (3 sticks) butter, softened
400g Lindt orange intense chocolate (or about 350g dark chocolate with 1/2 tsp orange essence/extract)
1/4 cup good quality cocoa powder
1/4 cup milk
600-700g (about 5-6 cups) icing sugar, sifted (I blitzed in a food processor to save time)
  1. In a heatproof bowl over a small saucepan of simmering water, melt chocolate (if using Lindt orange intense, strain mixture to remove almonds)
  2. Place butter in a large mixing bowl and beat on high with an electric mixer until light and fluffy.
  3. Add melted chocolate, cocoa powder and milk and beat on low for a minute to start to combine ingredients.
  4. Continue beating while gradually adding icing sugar until mixture is smooth and well combined. Adjust the amount of icing sugar until the desired texture is achieved. You want the mixture to be stiff enough to hold its shape but soft enough to be spreadable. If it is too stiff, add more milk.
To assemble cake:
Jaffa chocolate balls
Jaffa Cake biscuits (I got mine from Aldi)
Optional: gold leaf to decorate
  1. Trim the tops of the cake layers to remove any doming. Place one layer of cake on your cake stand or plate and carefully place a layer of jelly on top. Trim the jelly layer to the same circumference as the cake if there is any overhang. Try not to crack the jelly layer, but it is okay if it does break apart as the icing and cake will hold it together.
  2. Repeat with the remaining cake layers and jelly. 
  3. Crumb coat cake with a layer of icing, then chill cake for about 30 mins-an hour to allow coat to set.
  4. Cover cake with a thick layer of remaining icing using an offset spatula, to achieve the texture I created on the side of the cake, you can use an icing comb like this one.
  5. If you are using gold leaf, use a paintbrush to carefully decorate the edge of the cake with it.
  6. Top with macarons, jaffa balls and jaffa cakes. Chill cake to allow icing to set, and remove the cake from the fridge about 30 mins before serving.
Print Friendly and PDF

Wednesday, December 10, 2014

Candy Cane Peppermint and White Chocolate Swirl Cake

Candy Cane Peppermint and White Chocolate Swirl Cake
Remember how I made this crazy lollipop cake? Well I decided to take it one step further for Christmas and make a crazy Candy Cane cake! I love me some candy canes. They are so pretty and deliciously pepperminty. And now I have enough candy canes in my house to last me a lifetime. I may have gone slightly overboard stocking up on every single different sized candy cane I could find in the stores, because I wanted to make sure I had a good assortment to decorate this cake with.
Candy Cane Peppermint and White Chocolate Swirl Cake
How awesome are the super giant candy canes?! I got them at Target. This cake is far from perfect. I baked it on a super humid day, right before a storm hit and was rushing to get a photo of the cake before the sun completely disappeared. As a result I didn't let the cakes cool completely, the icing melted a little and the cake got messy. I'm sorry. But luckily my not so pretty icing can be covered up with pretty candy canes.
Candy Cane Peppermint and White Chocolate Swirl Cake
The icing is the lovely fluffy white chocolate icing that I made for these cupcakes, with a hint of peppermint. The cake inside is a super moist white chocolate mud cake, with a bit of a surprise. I added a bit of red food colouring to some of the batter to make a red and white marble cake. It's probably unnecessary and I know a lot of people aren't a fan of food colouring, so you can decide if you want to skip this step or not. I think it's kinda fun and a nice little surprise when you cut into the cake.
Candy Cane Peppermint and White Chocolate Swirl Cake
Just don't be like me and rush the making/cutting into of the cake, or things will get messy. It's the most important advice I can give you when making layer cakes - be patient. I rarely listen to my own advice on this, and it always gets me in trouble. Make this cake for a Christmas party and you're sure to wow people. You could even skip all the ridiculous candy canes on top (since they're there purely for decoration), and just cover the cake in crushed candy canes. I find the candy cane bits soften quite a bit in the fridge overnight, so you don't have to worry about the cake being too crunchy from them.
Candy Cane Peppermint and White Chocolate Swirl Cake
Candy Cane Peppermint White Chocolate Swirl Cake
(adapted from this recipe, icing adapted from this recipe)
For the icing (Note: Prepare the mixture for the icing before you start the cake as it will need time to chill):
340g (1.5 cups) unsalted butter
255g (9oz/1.5 cups of chips) good quality white chocolate (min 30% cocoa solids, do NOT use baking chocolate), finely chopped
2 tsp peppermint essence
Additional note: this only just makes enough cake to cover a 3 layer 6" cake, you can make 1.5x the amount of icing if you are making a larger cake. This icing is quite fiddly to work with and softens quickly at room temperature. If you are not comfortable with icing layer cakes I recommend you use this icing recipe instead.
  1. Prepare the icing mixture ahead of time as it will need to be chilled before whipping. Place butter and white chocolate in a large saucepan and melt over low heat, stirring regularly until smooth (the solids may separate but this is okay).
  2. Remove from heat and cool for 10 minutes, then chill in the fridge until solid, about 2 hours. If you are impatient like me you can stick it in the freezer for about half an hour.
  3. Prepare cake as per instructions below.
  4. Before you are ready to decorate your cake, remove white chocolate mixture from fridge at least 30 mins ahead of time to allow it to soften slightly.
  5. Place white chocolate mixture and peppermint essence in a large mixing bowl and beat on high with an electric mixer until very light and fluffy.
For the cake:
255g (9oz) butter, chopped
140g (5oz) white chocolate, chopped
370g (13oz/about 1 &3/4 cups) caster/granulated sugar
1 cup milk
225g (8oz/about 1 & 2/3 cups) plain/all-purpose flour
85g (3oz/about 2/3 cups) self-raising flour (can be replaced with an additional 2/3 cup plain flour plus 1 tsp baking powder)
1 tsp pure vanilla extract
2 eggs, lightly beaten
Optional: red food colouring (I used Americolor gel)
  1. Preheat oven to 170°C (340°F) (I set my fan-forced to 165°C), grease and line with baking paper three 15cm (6", this is what I used) or 18cm (7", will result in slightly thinner layers), or two 20cm (8") round cake tins.
  2. Place butter, white chocolate, sugar and milk in a large saucepan. Stir over low heat until smooth.
  3. Set mixture aside for 15 minutes to allow it to cool.
  4. Whisk in flours, vanilla and eggs until just combined.
  5. Place about 1/3 of the batter in a separate bowl and add red food colouring.
  6. Pour small amounts of red and white batter into your prepared tins, ensuring there is an equal amount of batter in each tin. Use a butter knife to run through the batter once to help swirl the red and white batter around a bit. I placed my batter into two pouring jugs to make this part easier.
  7. Bake for about 50-60 minutes (longer if your cakes are thicker obviously), until a skewer inserted into the centre comes out just clean. If the tops of your cakes start to brown too early you can cover the tins loosely with foil. 
  8. Cool on rack for 10 minutes and then carefully remove from tins and cool completely.
To assemble:
Variety of different sized and coloured candy canes
Red and white candy canes, crushed with a rolling pin
  1. Once your cakes are completely cool and your icing is whipped, place one layer of cake on your cake stand or plate. Spread a layer of icing over the top using a spatula.
  2. Sandwich with another layer of cake and repeat. Top with remaining cake layer.
  3. Crumb coat the cake with some of the prepared icing and chill for about 30 mins.
  4. Cover with a thicker layer of icing and smooth sides with an offset spatula. Running the spatula regularly under hot water will help to smooth the icing.
  5. Chill cake again to allow icing to set. Decorate the edge of the cake with crushed candy canes. You can leave the cake as it is for something a bit simpler/elegant, or go nuts and top the cake with lots of different candy canes. 
  6. Chill cake to allow icing to set again. Remove from the fridge 30 mins before serving.
Candy Cane Peppermint and White Chocolate Swirl Cake
Print Friendly and PDF

Monday, December 1, 2014

Christmas Wreath Macarons

Christmas Wreath Macarons
YAYYY! December is here! Far out this year has gone by quickly. There are a lot of intense things going on at the moment, but that hasn't stopped me from getting into the Christmas spirit. Christmas is my all-time favourite holiday to bake for, I never get sick of it and never find it too cheesy (unlike Valentine's Day). So I thought I'd kick off my baking for this month with some Christmas-themed macarons!
Christmas Wreath Macarons
You may remember some of my previous Christmas macarons; Penguins, Snowmen, Present boxes. This year I decided to make some Christmas Wreath Macarons. I piped them just like I piped my Doughnut Macarons, making sure to leave a big hole in the middle of each when I piped them since the mixture spreads out a lot as it settles. I'm totally not impressed with my actual macarons this time around, I underwhipped the meringue so the feet are pitifully small. But the idea is still super cute and festive so I wanted to share it with you guys.
Christmas Wreath Macarons
I was torn as to what filling to fill these with, but I ended up going with a cherry flavour. Cherry is one of those quintessential Australian Christmas fruits, with so much fresh, cheap cherries available at this time of the year. I actually used frozen cherries for this, to avoid wasting time pitting cherries, but you could use fresh ones, or use cherry jam to save even more time. And for those of you on the other side of the planet, you could always substitute it with a more Winter-friendly flavour like the egg-nog ganache in my penguin macaron recipe that I linked earlier.
Christmas Wreath Macarons
I love how vibrant and purple the filling is! This isn't a normal ganache, I didn't need to add any cream since the liquid from the cherry filling was enough to get the right consistency, but you can add some cream if you prefer. I found these adorable holly sprinkles online (link in the recipe below), but you can always just use regular long green sprinkles and round red sprinkles or cachous to decorate it. Anyway I'm hoping I have enough time to test out all the fun Christmas baking I have planned, we will have to wait and see. In the meantime, you can check out all my other Christmas recipes here.
Christmas Wreath Macarons
Christmas Wreath Macarons with Cherry Filling
(recipe adapted from Trissalicious)
For the macarons:
Note: this method uses an Italian meringue. If you prefer, you can continue to use the French method I normally use. If you are a beginner with macarons read up and practice plain macarons first. BraveTart has lots of useful advice and info on the subject
Almond Meal Paste:
125 grams almond meal
125 grams icing/confectioner's sugar
50 grams egg whites
Italian Meringue:
125g caster (granulated) sugar
35g water
50grams egg whites
Pinch of egg white powder
Green powdered/gel food colouring, sprinkles to decorate (I used these, Wilton also has these, plain red and green sprinkles will also be fine, or silver cachous)
  1. In a food processor, blend the almond meal, icing sugar and egg whites until this resembles a fine paste. Set aside.
  2. To make the Italian meringue, place the caster sugar in a saucepan.  Add the water and make sure that the sugar is dampened.  Heat the mixture and bring this to a boil (do not stir).  Place a candy thermometer in the syrup and take the temperature of 118°C (245°F)
  3. While the sugar is cooking, beat the egg whites and egg white powder using a stand mixer fitted with a whisk attachment and beat at medium speed until the eggs become foamy. Continue beating on high until stiff peaks form.
  4. Stop the syrup from cooking once it reaches 118°C (245°F) and take this off the heat and let the bubbling subside for a few seconds.  Pour the syrup in a thin, steady stream over the beaten egg whites while the continuing to whisk at medium speed.
  5. When all the syrup has been added, (add food colouring here) continue to beat until glossy and meringue has cooled to room temperature (around 10 to 15 minutes).
  6. Using a silicone spatula, fold a third of Italian meringue into the almond mixture to loosen it.  Then, fold in the rest of the Italian meringue.  (You really want to beat all the large bubbles out of the mixture, which is easily done by smearing the mixture on the bottom and side of the bowl with your spatula) Continue folding and stirring until the batter is glossy, and fluid. Take care not to overmix, the mixture should flow like lava and a streak of mixture spread over the surface of the rest of the mixture should disappear after about 30 seconds. 
  7. Place mixture in a piping bag with a narrow (about 0.3cm) round piping tip. Pipe a thin ring about 4cm wide on your prepared trays, leaving about 3cm space around each one. (Make sure to pipe these with a wider hole in the centre than you want the final shape to be, as the mixture will spread slightly)  Tap baking trays carefully and firmly on the benchtop a couple times to remove any large bubbles. Top with red and green sprinkles.
  8. Leave to dry for about 60 mins, until when you press the surface of one gently it does not break/stick to your finger. This will help prevent any cracking and help the feet to form on the macs.
  9. Preheat your oven to 130-150°C (265-300°F), depending on your oven (fan-forced ovens may need to be set as low as 100°C, it really depends) . You can place the tray of piped shells on top of an upside-down roasting tray or another baking tray, for better heat distribution.
  10. Bake for 15-20 minutes. Carefully test if the base of the shell is ready by gently lifting one and if it’s still soft and sticking to the baking paper, then it needs to bake for a few minutes longer. 
  11. Remove from the oven and cool on the tray for a few minutes, then gently remove from the sheet and place on a wire rack to cool completely.
Christmas Wreath Macarons
For the Cherry Filling:
Note: You can replace the cherry sauce with store-bought cherry jam to save time
50g (1.7oz) cherries (fresh or frozen), pitted and diced
2 tbsp sugar
1 tsp lemon juice
A few drops of pure vanilla extract
1 tsp cornflour (cornstarch) + 1/2 tsp cold water
100g (3.5oz) good quality white chocolate, finely chopped
  1. Prepare the cherry filling first; place diced cherries, sugar, lemon juice and vanilla in a small saucepan and place on medium heat. Stir over heat until sugar dissolves. 
  2. Mix cornflour and water together in a separate small bowl then add to the saucepan and stir over medium heat until mixture thickens, about 2-3 minutes. Set aside to cool. 
  3. Place cherry mixture and chopped white chocolate in a heatproof bowl and stir over a pot of simmering water until the chocolate melts and the mixture combines (if chocolate splits, add 1 tsp of water at a time and stir over heat until mixture reincorporates). 
  4. Chill mixture until it thickens (if it is too runny, you can add melt more white chocolate into it), and then spoon mixture between macarons shells.
  5. Chill macarons in an airtight container overnight to allow flavour to mature. Serve at room temperature.
Print Friendly and PDF

Tuesday, November 18, 2014

Raspberry Swirl Pavlova with Summer Fruits

Raspberry Swirl Pavlova with Summer Fruits
You know what's strange? I love eating pavlova, it is one of my favourite summer treats but somehow I have never made it before. In all the years of baking, all the cakes and macarons and cupcakes, I have yet to make my own pavlova. So when I was asked to make one for an upcoming BBQ, I actually got nervous. What fruits should I choose? What if I completely stuffed up the meringue? Should I do anything to mix it up a bit or should I not mess with a classic?
Raspberry Swirl Pavlova with Summer Fruits
In the end I didn't add too much to it, I swirled a delicious raspberry sauce into the cream, which was a whipped mix of regular cream and mascarpone. Berries and mangoes are super cheap and in season here in Australia, so I went a little nuts with those. I know its not summer just yet but this just feels so summery. By the way, the pav shown in the photos is a mini version, the recipe below actually makes a full size pavlova. Obviously I couldn't prepare and photograph the pavlova the day before the BBQ so I made an extra mini one to practice. The full-sized one that I served up actually looked even better because it was piled super high with so much fruit and the raspberry sauce was swirled better. I wish I could have photographed it! Oh well, it went down really well and everyone was a big fan of the raspberry swirled cream. I think it added something a little special.
Raspberry Swirl Pavlova with Summer Fruits
Sooo, this is probably what you're all waiting for! Thanks so much to everyone who entered the cookbook giveaway last week, it was really lovely to see so many entries and read all about your dream cakes! It was incredibly difficult to choose just one entry, if I could give out a book to every one of you I would! So the winner is *drumroll*......
winner
Congratulations E. Danieletto! Check your inbox and get back to me quick and you will have a copy of  Lomelino's Cakes : 27 Pretty Cakes to Make Any Day Special by Linda Lomelino thanks to Roost Books coming your way!
Raspberry Swirl Pavlova with Summer Fruits
(meringue recipe from Gourmet Traveller, serves 8)
For the meringue:
4 eggwhites, at room temperature (even better if aged i.e. separated and stored in the fridge overnight, or even frozen and defrosted)
A pinch of salt
240g (about 1 & 1/3 cups) caster (superfine) sugar
1 tbsp cornflour
1 tsp white vinegar
1 vanilla bean, scraped seeds only
For dusting: melted butter or vegetable oil + extra cornflour
  1. Preheat oven to 100°C. Line a large baking tray with baking paper, brush with butter/oil and dust with cornflour.
  2. Whisk eggwhites and a pinch of salt in the bowl of an electric mixer until soft peaks form. With motor running, add sugar, a tablespoon at a time, whisking until sugar dissolves (5-10 minutes, you can check it by pinching a small amount of mixture between your fingers). 
  3. Fold in cornflour, vinegar and vanilla seeds, then pile mixture into a 20cm-diameter circle on oven tray, gently smoothing top and making a slight indentation. 
  4. Bake in centre of oven until crisp but not coloured (1-1¼ hours). Turn off oven and leave to cool completely with door ajar. Meringue will keep in an airtight container for up to 4 days.
For the raspberry sauce:
150g (125oz) raspberries, fresh or frozen
1/4 cup sugar
2 tsp lemon juice
1 tbsp cornflour (cornstarch) + 2 tsp cold water
  1. Place raspberries, sugar, and lemon juice in a medium saucepan and place on medium heat. Stir over heat until sugar dissolves. 
  2. Mix cornflour and water together in a separate small bowl then add to the saucepan and stir over medium heat until mixture thickens, about 3-4 minutes. Strain to remove seeds and then set aside to cool.
To assemble:
2.5 cups cream (thickened/heavy cream will do, but I used 1 cup thickened, 1 cup double cream and 250g mascapone to give it a slightly richer texture)
1/4 cup icing/confectioner's sugar, sifted
1 vanilla bean, scraped seeds only
Selection of summer fruits; I used fresh raspberries, blueberries and diced strawberries (1 punnet each) and mango (2 mangoes) and a bit of passionfruit (1)
  1. Whip cream first; place creams in a large mixing bowl with icing sugar and vanilla seeds and beat on high with an electric mixer until it reaches soft peaks. Take care not to overmix (especially if you add the double cream, its very easy to overwhip). Cream can be whipped a couple of hours ahead of time and stored in an airtight container in the fridge.
  2. Only assemble your pavlova when you are ready to serve it or it will go soggy.  Place meringue on serving plate or stand. 
  3. Add raspberry sauce to your cream and use a spatula to give it a couple of quick folds. Spread cream mixture of the top of your meringue (sauce will swirl throughout the cream as it spreads on).
  4. Top with fresh fruit and serve immediately.
Print Friendly and PDF

Tuesday, November 11, 2014

Chocolate Chip Buttermilk Cake with Orange Icing & a Giveaway!

Chocolate Chip Buttermilk Cake with Orange Icing
Sometimes all you need is a good old-fashioned tea cake with a thick layer of icing on top. This buttermilk cake was made for an afternoon tea, chock-full of chocolate chips and topped with an orange-flavoured butter icing. It was simple but satisfying. The buttermilk cake in this recipe has become one of my go-to recipes for when I want to whip up a cake that's fairly easy. It's an incredibly forgiving recipe, since the buttermilk ensure that the cake stays rich and moist even if you forget about it and leave it in the oven too long like I did.
Chocolate Chip Buttermilk Cake with Orange Icing-4
Interestingly (in a bad way) my icing curdled when I added orange juice to it, and I figure it was because I am super lazy and was whipping my butter when it was still really cold (thanks to my powerful kitchenaid), so I melted another 2 tbsp of butter and whipped it into the mixture, which seemed to fix it up. I'm always a fan of any tips that can stop me from having to throw away wasted ingredients!
Chocolate Chip Buttermilk Cake with Orange Icing-2
On to something very exciting; for the longest time I've been a HUGE fan of the wonderful blog Call Me Cupcake! by Linda Lomelino. She bakes the most beautiful creations and takes stunning photographs, it's the kind of work that I aspire to create. Her pink rainbow cake was one of the first ombré cakes I ever saw, and inspired me to create my favourite cake. So you can imagine my excitement when I heard that an English version of her first book, Lomelino's Cakes : 27 Pretty Cakes to Make Any Day Special was finally being published AND I had the opportunity to share a copy of the book with you. That's right, my very first cookbook giveaway! It's an absolutely gorgeous book, full of the prettiest looking cakes I've seen in a while and plenty of handy tips for making beautiful cakes. P.S. For those of you interested, the book will be on sale in bookstores from November 11th (that's today!).
lomelino's cakes
From Lomelino’s Cakes by Linda Lomelino, © 2014 by Linda Lomelino. Reprinted by arrangement with Roost Books, an imprint of Shambhala Publications Inc., Boston, MA. www.roostbooks.com
To enter for a chance to win 1 copy of Lomelino's Cakes : 27 Pretty Cakes to Make Any Day Special by Linda Lomelino: Leave a comment below and tell me, what is your dream birthday cake? This giveaway is currently open to Australian residents only, and closes Monday 17 November 2014. I will select one entry and announce the winner on Tuesday 18 November. Make sure to include your email address in the comment form (you can enter it in the Name/URL box) when you enter so I can contact you if you're the lucky winner! Thanks to Kate from Roost Books for organising this.
This giveaway is now closed! Thanks everyone who entered, come back tomorrow to check if you're a winner!
Chocolate Chip Buttermilk Cake with Orange Icing-3
Chocolate Chip Buttermilk Cake with Orange Icing
(adapted from this Gourmet Traveller recipe)
For the cake:
165g (about 1.5 sticks) butter (I used salted, if using unsalted add a pinch of salt to your flour mixture), softened
220g (1 cup) sugar (I used caster/superfine)
2 eggs, room temperature
1 tsp pure vanilla extract or vanilla bean paste
200g (about 1.5 cups) plain/all-purpose flour
100g (about 3/4 cups) self-raising flour
1/4 tsp bicarb (baking) soda
220ml (about 1 cup minus 2 tbsp) buttermilk (or milk mixed with 1 tsp lemon juice)
1 cup milk or dark chocolate chips
  1. Preheat oven to 170°C (340°F) and grease and line a 21cm or 23cm round cake tin (7 inch or 8 inch, baking time will vary) /or a 20cm square cake tin with baking paper. 
  2. Mix flours and baking soda in a bowl together and set aside
  3. Place butter and sugar in a large mixing bowl and beat on high with an electric mixer until light and fluffy. 
  4. Add eggs one at a time, beating to combine. 
  5. Add vanilla and beat to combine.
  6. With the mixer on low speed add half the flour mixture, follow by half the buttermilk mixture. Repeat with remaining flour and buttermilk. Mix until just combined.
  7. Fold in chocolate chips and pour mixture into prepared tin. Bake for 50-60 minutes or until a skewer inserted into the centre comes out clean. (I used a 21cm round tin and it took about 70 mins)
  8. Cool in tin for 10 minutes then carefully remove from tin, cover with a tea towel and cool on wire rack before serving.
For the icing:
150g (1 & 1/3 sticks) butter, at room temperature
2 cups (250g) icing/confectioner's sugar, sifted
About 1/4 cup orange juice, adjust to taste and texture
  1. Place butter in a large mixing bowl and beat on high with an electric mixer until fluffy. 
  2. Gradually add icing sugar and continue to beat until combined and smooth.
  3. Adding orange juice and beat, adjust to taste and texture (if the mixture becomes too runny, add more icing sugar).
  4. Spread a thick layer of icing over the top of the cake using a spatula. Serve immediately or can be stored in an airtight container at room temperature for a couple of days.
Print Friendly and PDF

Monday, November 3, 2014

Cherry and Vanilla White Chocolate Tart with a Brown Butter Shell

Cherry and Vanilla White Chocolate Tart with a Brown Butter Shell
This year I've been enjoying the good and the bad parts of being a homeowner. As someone whose family moved around a lot when I was younger, it feels amazing to put roots down. Perth, Doha and Kuala Lumpur were all wonderful but Sydney is home. It's been great to have a place of our own, but also stressful and expensive. I still haven't had a proper housewarming party because we are furnishing and improving our place at such a snail's pace. Last weekend was my first moment of breathing space in a long, long time and I got to potter around my kitchen and really enjoy being in this house.
Cherry and Vanilla White Chocolate Tart with a Brown Butter Shell
It was the first weekend in a long time that I didn't have to make a birthday cake for someone, which was kind of a relief. I could make whatever I felt like and this tart was the result. I managed to score some fresh cherries for fairly cheap and I wanted to make something that would allow them to be enjoyed just as they are. I made the most delicious brown butter tart shell which filled the house with its beautiful aroma as it baked. I whipped up a very simple white chocolate and vanilla bean cream filling that would complement the cherries without overpowering their flavour.
Cherry and Vanilla White Chocolate Tart with a Brown Butter Shell
If you've read my blog before then you've probably heard me wax lyrical about the wonders of brown butter. The smell and flavour really elevates any baked good that you add it to. This tart was no exception, I would have happily eaten the tart shell on its own like a giant cookie. But the filling is pretty great too if you're lucky enough to get your hands on some fresh cherries. If not, this would work great with fresh strawberries or blueberries as well. I have a feeling this tart will become one of my go-to recipes whenever I find some fresh berries on sale.
Cherry and Vanilla White Chocolate Tart with a Brown Butter Shell
Errr so I posted on facebook all excited about a giveaway I was going to share with you guys this week, but I'm an idiot who doesn't read my emails properly, so it will actually be happening next week. So please come back soon for my very first blog giveaway! Those who know me will know that I'm not big on the PR stuff, so I am only going to do a giveaway for you guys if I think it's really good and relevant to this blog. Trust me, it's good! But for now you will have to settle for this recipe.
Cherry and Vanilla White Chocolate Tart with a Brown Butter Shell
Cherry & Vanilla White Chocolate Tart with a Brown Butter Shell
(makes one 24cm tart, tart shell adapted from this recipe)
For the brown butter tart dough:
125g (4.5 oz/just over 1 stick) butter
105g (3.75 ounces/about 1/2 cup) sugar
35g (1.25 ounces) brown sugar
1 tsp pure vanilla essence
1/4 tsp salt
3 egg yolks
300g (10.6oz/ about 2.5 cups) plain/all purpose flour, sifted

Prepare the brown butter ahead of time as you will need to chill it:
  1. Place butter in a small saucepan on low-medium heat and stir until it melts completely.
  2. Continue cooking, stirring frequently until the milk solids turn brown and the butter smells nutty, about 5 minutes longer (or as long as it takes to turn golden brown). Take care not to burn (it will continue to brown even after you remove it from the heat, so take it off early).
  3. Scrape the melted butter and browned bits into small bowl and chill until solidified (about half an hour in the freezer, an hour or so in the fridge). When ready to make cake, remove from the fridge long enough that the butter is soft enough to be beaten with an electric mixer
  4. With a hand or stand mixer, combine sugars, vanilla extract, salt and brown butter on medium speed. Mix only until ingredients are thoroughly combined, but by no means light and fluffy.
  5. Add in the yolks, one at a time then reduce speed to low. 
  6. Add in the flour all at once and mix until homogenous. If you’re comfortable with dough and a pin, you can roll it right away with very lightly floured hands and rolling pin. Otherwise, form the dough into a disk, wrap in plastic, and refrigerate about 15 minutes to make the it easier to handle. You can refrigerate the dough for up to a week or freeze for several months. Before rolling, set the dough out and let it slowly come to room temperature over a few hours. 
  7. Preheat the oven to 180°C (350° F) and lightly grease a 22-24cm loose bottomed tart tin. Dust the counter with a very, very light coat of flour. Roll to 0.75cm (1/3") thickness.Carefully set dough over the tart shell and use your thumbs to press the dough into the corners of the pan. Press the overhanging dough against the edges of the tart pan to trim off the excess and leave the dough flush with the edges. Dock tart lightly with a fork. The dough is extremely forgiving and can be rerolled two or three times, you should be able to press any cracks together to mend them or fill any defects with leftover dough by pressing it gently together. 
  8. Bake for 20-25 minutes. After 10 minutes or so, check on the tart. If it has formed an air bubble; use a skewer to gently poke a small hole in the bubble to deflate it. Continue baking until the tart is dark golden brown and firm and dry to the touch. (It is better to slightly overbake than underbake to prevent any raw taste.) Cool in tin for about 10 minutes, then carefully remove from tin and cool completely on a wire rack. Shell can be stored in an airtight container overnight. 
For the Cherry & Vanilla White Chocolate filling:
1 & 1/2 cups thickened/heavy cream
300g good quality white chocolate, chopped
1 tsp vanilla bean extract or scraped seeds from 1 vanilla bean pod
About 300g fresh cherries, pitted and halved
  1. Place 1 cup of cream in a large mixing bowl and set aside.
  2. Place 1/2 cup cream and white chocolate in a heatproof bowl and heat over a small saucepan of simmering water, stirring regularly with a whisk until chocolate melts and mixture is smooth. Leave to cool for 5 minutes.
  3. Whip remaining cream with an electric mixer on high until stiff peaks form. Take care not to overwhip. 
  4. Stir 1/3 of the whipped cream into the white chocolate mixture to loosen it, then fold the remaining cream into the mixture until combined. Pour mixture into the brown butter tart shell (You may not need to use all the filling, depending on the height of your tart, remember that when you add the cherries on top, the filling will rise slightly). Decorate with fresh cherries.
  5. Chill tart until filling sets, at least 1 hour. Tart can be stored in the fridge in an airtight container for several days.
Cherry and Vanilla White Chocolate Tart with a Brown Butter Shell
Print Friendly and PDF